
The difference between a floor that looks professionally done and one that screams “DIY project” is all in the details. It’s the perfectly straight lines, the seamless transitions through doorways, and the solid, quiet feel underfoot. These results don’t happen by accident. They are the product of careful planning and precise execution. From letting the planks acclimate to your home’s environment to leaving the correct expansion gaps along the walls, every step matters. This guide is your roadmap to a successful floating lvp flooring installation, covering the critical techniques that ensure a flawless, durable finish that you’ll be proud of.
Key Takeaways
- Proper prep is non-negotiable for a lasting floor: Before you start, make sure your subfloor is completely clean and flat. Also, let your new LVP planks acclimate to your home’s environment for at least 48 hours to prevent future buckling or gaps.
- Master the details for a stronger installation: Two simple rules make a huge difference in durability. Always leave a 1/4-inch expansion gap around the room’s perimeter and stagger the plank seams between rows for a stable, professional-looking finish.
- Know when to call an expert for a guaranteed result: While DIY is an option for simple spaces, hiring a professional is the best way to handle tricky layouts or tight timelines. An expert ensures the job is done right the first time, giving you a flawless floor without the stress.
What Is Floating LVP Flooring?
When you hear the term “floating floor,” it doesn’t mean your flooring is levitating. It simply means the planks aren’t glued or nailed to the subfloor underneath. Instead, the individual planks connect to each other, creating a single, unified surface that rests securely on top of the subfloor. Its own weight and the tight connections hold everything perfectly in place. This innovative method is one of the main reasons luxury vinyl plank (LVP) flooring has become such a popular choice for homeowners across the Dallas-Fort Worth area. It combines modern engineering with beautiful design for a floor that’s both practical and stylish. The installation is efficient, clean, and delivers a flawless look without the need for messy adhesives or loud nail guns, making it an ideal solution for a quick and high-quality home update.
How a Floating Floor Clicks Together
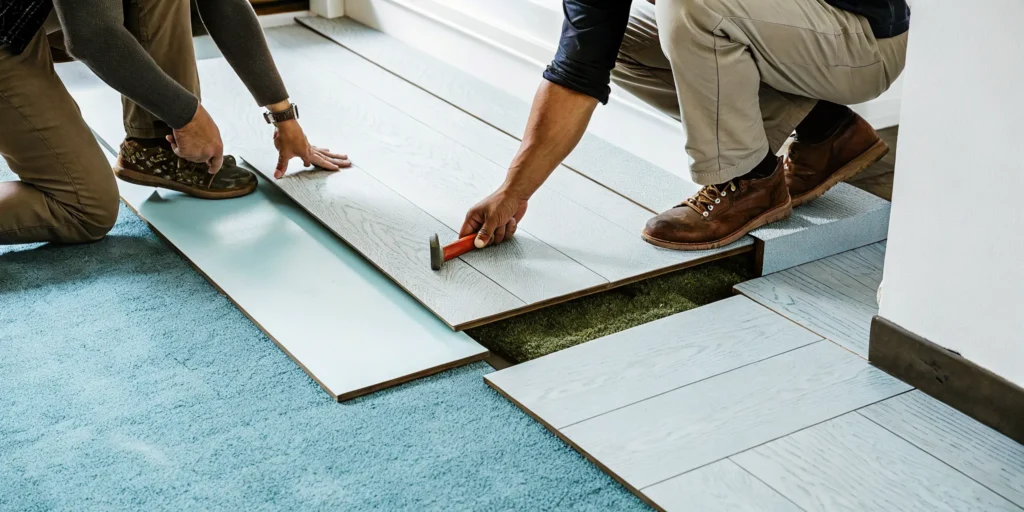
The magic behind a floating LVP floor is its click-lock system. Each plank has a specialized tongue-and-groove design along its edges that allows it to snap securely into the next one. During installation, we angle a new plank against the one already laid, slide the tongue into the groove, and then lower it into place. A gentle tap with a mallet ensures the connection is tight and seamless, creating a strong bond between the planks. This process is repeated across the entire room, forming a durable, interconnected surface that won’t shift or separate over time when installed correctly.
Why It Beats Glue-Down and Nail-Down Methods
Compared to traditional installation methods, a floating system offers some clear advantages. Glue-down installations can be messy and involve strong-smelling adhesives, while nailing down hardwood creates noise and dust. The floating click-lock method is much cleaner and significantly faster, which means less disruption to your home and your routine. Because the planks aren’t permanently bonded to the subfloor, this method is also more forgiving over concrete slabs, which are common in North Texas homes. It allows the floor to respond naturally to subtle shifts in temperature without buckling or warping.
The Perks: Durability and Long-Term Value
Beyond the installation benefits, floating LVP floors are built to handle real life. The material is incredibly resilient, standing up to scratches from pet claws, spills in the kitchen, and heavy foot traffic in entryways. Its water-resistant properties make it a fantastic choice for any room in the house, including bathrooms, laundry rooms, and basements. This durability means your floor will continue to look great for years with minimal upkeep. For busy families and homeowners who want a beautiful floor without constant worry, the combination of strength and style makes floating LVP a smart, lasting addition to any home.
Prep Your Room for a Flawless Finish
The secret to a beautiful, long-lasting floor isn’t just in the final plank you lay. It’s in the careful preparation you do before you even start. This is the step that separates a professional-looking installation from a DIY project that shows its flaws over time. A perfectly prepped room ensures your planks click together smoothly, lay flat without any bounce or creaks, and withstand daily life for years to come. It might feel like extra work upfront, but taking the time to get the foundation right is the most important investment you can make in your new floor.
Think of it this way: you’re creating a clean, stable canvas for your LVP. This involves three key stages: getting your subfloor in perfect shape, allowing your new planks to adjust to your home’s environment, and setting up a clean, organized workspace. Skipping any of these can lead to frustrating issues down the road, like gaps between planks, buckling, or an uneven finish. At Next Day Flooring, we know that meticulous prep is the foundation of our work. It’s how we guarantee a flawless result that not only looks great on day one but also performs beautifully for the long haul.
Inspect and Prepare Your Subfloor
Your new LVP is only as good as the surface it sits on. The subfloor, whether it’s concrete or plywood, must be perfectly clean, flat, and smooth. Start by removing the old flooring, baseboards, and any leftover staples or adhesive. Once the subfloor is bare, sweep and vacuum it thoroughly to get rid of all dust and debris. Next, check for imperfections. Fill any cracks or holes with a patching compound and sand down any high spots or bumps. A level subfloor is non-negotiable for a stable, quiet luxury vinyl plank floor that feels solid underfoot.
Let Your LVP Planks Acclimate
This step is simple but crucial: give your flooring time to get used to its new home. LVP expands and contracts slightly with changes in temperature and humidity. To prevent it from buckling or developing gaps after installation, you need to let it acclimate. Just open the boxes and lay the planks flat in the room where they will be installed for at least 48 hours. This allows the material to adjust to your home’s specific climate, ensuring the planks remain stable and securely locked together once they’re on the floor. Don’t skip this waiting period; your patience will pay off.
Clear and Clean the Installation Area
A tidy workspace is an efficient workspace. Before you begin, remove all furniture, rugs, and decor from the room. You need a completely empty space to work without obstruction. It’s also a good idea to set up a designated cutting station, preferably in an adjoining room or garage. This keeps sawdust and small vinyl shavings out of the installation area, which is important for ensuring the locking mechanisms on the planks stay clean and click together perfectly. Having a clear, organized room makes the entire process smoother, safer, and faster from start to finish.
Gather Your Tools and Materials
Before you lay the first plank, it’s smart to gather everything you’ll need. A well-organized workspace makes the installation process much smoother and helps you avoid interruptions. Having the right tools on hand ensures your cuts are clean, your planks fit snugly, and your new floor looks professional from every angle. This simple prep step is one of the biggest keys to a successful DIY project.
Your LVP Installation Toolkit
Most tools for installing LVP are probably in your garage, but a few specialty items make a huge difference. Here’s a checklist of what to have ready:
- A quality utility knife with extra blades
- Measuring tape and a pencil
- A straightedge or carpenter’s square
- Spacers (usually 1/4-inch) for expansion gaps
- A tapping block and rubber mallet to lock planks together
- A pry bar to set the last row in place
- Knee pads and safety glasses
- A saw (a miter saw or jigsaw is best for tricky cuts)
Having these items ready will help you install your new luxury vinyl plank flooring efficiently and with fewer headaches.
Choose the Right Underlayment
Underlayment is a thin layer between your subfloor and LVP that adds cushioning, absorbs sound, and smooths minor imperfections. The good news is that many modern LVP products come with an underlayment pad already attached, which simplifies installation. If your planks don’t have one, you’ll need to roll out a separate layer. For concrete subfloors, a vapor barrier is essential to block moisture from damaging your floors. Always check the manufacturer’s instructions to see what they recommend for your specific product. You can find more details about material selection in our flooring FAQs.
Don’t Forget Your Safety Gear
Protecting yourself is just as important as protecting your new floors. At a minimum, wear safety glasses to shield your eyes from dust and debris, especially when cutting planks. A good pair of work gloves will protect your hands from sharp edges, and knee pads are a must for staying comfortable. Before you begin, give the subfloor one last thorough cleaning. Vacuum up all dust and debris, because even a small pebble left behind can create a bump under your new flooring. A clean start is the foundation for a beautiful, long-lasting finish.
Measure and Plan Your Layout
A good plan is the difference between a floor that looks like a weekend project and one that looks professionally installed. It saves time, reduces waste, and prevents major issues down the road. Before you click a single plank into place, taking the time to measure and map out your room will set you up for a smooth installation. Let’s walk through three key planning steps: getting your measurements right, planning your plank layout, and leaving room for the floor to breathe.
Calculate Your Square Footage (and Add for Waste)
First, you need to know how much flooring to buy. Grab a tape measure and find the length and width of your room. Multiply those two numbers together to get your total square footage. For example, a 10-foot by 12-foot room is 120 square feet. But don’t stop there. It’s essential to add a “waste factor” of at least 10% to your total. This extra material covers any cutting mistakes, tricky angles, or damaged planks. It also gives you a small stash for future repairs, ensuring you have perfectly matched LVP flooring if a replacement is ever needed.
Map Out Your First Row and Stagger the Seams
Your first row of planks sets the foundation for the entire floor, so it needs to be perfectly straight. Once you’ve established that line, the key to a strong, visually appealing floor is staggering the seams. This means the end joints of the planks in one row should never line up with the joints in the rows next to them. A good rule of thumb is to keep at least six to eight inches between seams. This pattern distributes stress across the floor, preventing weak spots and creating a more natural wood-look finish. As you work, use a tapping block to gently lock the planks together for a tight, secure fit.
Leave Room for Expansion Gaps
This step is one of the most important and most often overlooked. All floating floors need room to breathe. As temperatures and humidity levels change in your Dallas-Fort Worth home, the flooring will naturally expand and contract slightly. To allow for this movement, you must leave a 1/4-inch gap between the flooring and every wall or fixed object (like cabinets or door frames). Use spacers to maintain this gap as you install each row. Don’t worry about how it looks; your baseboards and trim will cover the gap completely, leaving you with a flawless and durable floor that won’t buckle or warp over time. This is a critical part of all professional flooring installations.
How to Install Floating LVP: A Step-by-Step Guide
Once your room is prepped and your tools are ready, it’s time for the most rewarding part: laying the floor. The click-lock system of floating LVP is designed to be user-friendly, but the secret to a professional-looking result is patience and precision. Taking your time with the first few rows will set you up for success and make the rest of the installation go much more smoothly. Follow these steps carefully to ensure your new floors look fantastic and last for years.
Lay the First Row Perfectly
Your first row is the foundation for the entire floor, so getting it straight is critical. Start by laying your first plank in a corner, making sure the tongue side faces the wall. You’ll need to leave a small gap, typically about 1/4-inch, between the planks and the wall. This expansion gap is essential because it allows the flooring to expand and contract with temperature changes without buckling. Use spacers to maintain this gap consistently along the entire wall. Continue laying planks end-to-end until you reach the other side of the room.
Click Planks Together and Keep Them Straight
With your first row in place, you can start the second. Modern LVP uses a click-lock or tongue-and-groove system. To connect the planks, hold the new plank at a slight angle and fit its tongue into the groove of the plank in the first row. Lower it until it clicks into place. To ensure a tight, seamless fit, gently tap the edge of the plank with a tapping block and a rubber mallet. This helps lock the planks together without damaging them. Continue this process, making sure each plank is snug against its neighbor and your rows stay perfectly straight.
Navigate Doorways and Tricky Corners
Floors are rarely perfect rectangles. You’ll inevitably run into doorways, vents, and corners that require custom cuts. For these tricky spots, you’ll need to measure carefully and cut your planks to fit. Creating a paper template can help you get the shape just right before cutting the actual plank. When you reach a doorway, it’s important to install a transition strip. This piece covers the seam where your new LVP flooring meets another type of flooring, like tile or carpet, giving the transition a clean and finished look.
Make Your Cuts and Add Transition Strips
When you reach the end of a row, you’ll almost always need to cut the last plank to fit. Measure the remaining space, remembering to account for the 1/4-inch expansion gap. You can use a utility knife to score and snap the plank or a saw for a quicker cut. The leftover piece from this cut can often be used to start your next row, as long as it’s not too short. This creates a natural, staggered pattern. Once the entire floor is laid, you can install your transition strips in doorways and finish the perimeter.
Add the Finishing Touches for a Pro Look
You’ve laid the last plank, and your new floor is starting to take shape. This is the exciting part, but the job isn’t quite finished. These final steps are what create a polished, professional result that lasts for years. Taking the time to handle the trim, clean up properly, and inspect your work will make all the difference. It’s these details that transform a good installation into a great one, ensuring your new LVP floors look like they were installed by a seasoned pro.
Install Baseboards and Trim
With the flooring in place, it’s time to cover those expansion gaps and give your room a clean, finished edge. First, carefully remove all the spacers you placed along the walls. Now you can reinstall your original baseboards or add new ones for an updated look. Secure the trim to the wall, not the floor, using a brad nailer for a clean finish. This allows the floating floor to expand and contract naturally underneath. For a seamless look, apply a thin bead of caulk along the top edge where the baseboard meets the wall and fill any nail holes before painting.
Clean Up and Inspect Your New Floor
A thorough cleanup is essential for protecting your new floor and admiring your hard work. To minimize mess from the start, it’s always a good idea to do your cutting in a separate area, like a garage or patio, to keep sawdust off your new planks. Give the floor a good sweep with a soft-bristle broom to remove any debris, followed by a vacuum (use a hard floor setting without the beater bar). Then, you can do a light damp-mopping. As you clean, do a final inspection. Walk the entire floor, looking for any gaps or planks that don’t feel secure. This final check ensures your luxury vinyl plank flooring is ready for daily life.
Maintain the Right Room Conditions
Your LVP flooring needs a stable environment to perform its best over the long term. Remember how you let the planks acclimate before installation? The same principle applies now. Try to keep your home’s temperature consistent throughout the year, avoiding extreme swings in heat and humidity. This is especially important in the Dallas-Fort Worth area, where the weather can change quickly. Maintaining a stable indoor climate helps prevent the planks from expanding, contracting, or buckling over time. This simple step protects your investment and keeps your floors looking beautiful for years. If you have questions about long-term care, our team is always happy to help.
Common LVP Installation Mistakes to Avoid
Luxury vinyl plank is a fantastic flooring choice, but its durability and good looks depend entirely on a proper installation. A few common mistakes can keep it from looking its best and performing well over time. Even small oversights can lead to big headaches down the road, like planks that buckle, separate at the seams, or feel uneven underfoot. Getting the details right from the start is the secret to a floor that you’ll love for years to come, one that stands up to daily life without issues.
Let’s walk through the most frequent trip-ups we see homeowners in the Dallas-Fort Worth area encounter. Understanding these pitfalls is helpful whether you’re planning a DIY project or hiring a professional. Knowing what to look for ensures your new floor is stable, durable, and beautiful from day one. A professional installation handles all these details correctly, giving you peace of mind that the job is done right the first time and your investment is protected. We’ll cover everything from preparing the subfloor to letting the planks acclimate, so you can feel confident in the process and avoid the frustration of a failed installation.
Skipping Subfloor Prep and Expansion Gaps
The success of your new LVP floor starts with what’s underneath it. Installing planks over an uneven, dirty, or damaged subfloor is a recipe for disaster. The planks won’t lock together properly, leading to weak spots, squeaking, and an unstable feel underfoot. Before laying the first plank, your subfloor must be perfectly clean, dry, and flat. This means filling any cracks or holes and sanding down any high spots. It’s also essential to leave a small expansion gap, typically about a quarter-inch, between the flooring and the walls. This tiny space allows the vinyl planks to expand and contract with temperature changes without buckling.
Poor Seam Staggering and Bad Cuts
Have you ever seen a floor where the seams between planks line up, creating an obvious “H” pattern? That’s a sign of poor staggering. For a strong and natural-looking floor, the end joints of your planks should be staggered by at least six to eight inches from one row to the next. This pattern distributes weight and stress evenly, preventing the seams from separating over time. It also creates a more visually appealing, random look that mimics real wood. Likewise, inaccurate cuts around door frames or corners can leave unsightly gaps that are difficult to hide with trim, giving the whole project an unprofessional finish.
Forgetting to Acclimate Your Planks
Vinyl plank flooring needs time to adjust to its new environment before installation. We call this process acclimation. You should let the unopened boxes of LVP sit in the room where they will be installed for at least 48 hours. This allows the material to get used to the home’s specific temperature and humidity levels. If you skip this step, the planks might expand or shrink after they’re already clicked together, causing the floor to buckle or pull apart at the seams. It’s a simple step that prevents major issues down the road and is a standard part of any professional flooring installation.
How to Care for Your New LVP Floors
Congratulations on your beautiful new floors! One of the best things about luxury vinyl plank is how simple it is to maintain. You don’t need special equipment or complicated routines to keep it looking brand new. With just a few easy habits, you can protect your investment and ensure your floors stay stunning for years to come. Here’s a straightforward guide to caring for your LVP.
The Right Way to Clean Your LVP
While LVP is incredibly durable, it still needs regular cleaning to look its best. The key is to be gentle. Start by sweeping or vacuuming (using a hard floor setting without the beater bar) every couple of days to pick up dirt and grit that can act like sandpaper on the finish. For a deeper clean, a weekly damp mop is all you need. Use a soft mop and a pH-neutral cleaner specifically designed for vinyl. Avoid using harsh chemicals like bleach, ammonia, or abrasive cleaners, as they can dull the protective wear layer and damage your floor’s finish over time.
Prevent Scratches, Dents, and Damage
The easiest way to keep your floors looking great is to stop damage before it starts. Place felt pads under the legs of all your furniture, especially heavy pieces like sofas, tables, and entertainment centers. This simple step prevents scratches when furniture gets bumped or shifted. When you need to move something heavy, always lift it instead of dragging it across the floor. It’s also a great idea to place doormats at every entrance to your home. They’ll catch the dirt, sand, and small rocks that can get tracked in on shoes and cause tiny scratches that build up over time.
Your Simple Long-Term Care Plan
Keeping your LVP in top shape doesn’t require a lot of effort, just consistency. Here’s a simple routine to follow. On a daily basis, give your floors a quick sweep to clear away any debris. Once a week, use a damp mop with a mild, pH-neutral cleaner to wash away grime. If a spill happens, wipe it up right away to prevent any potential staining or moisture issues. By following these simple steps, your luxury vinyl plank flooring will continue to be a durable and beautiful foundation for your home. It’s all about creating small habits that protect your floors for the long haul.
DIY or Hire a Pro in Dallas-Fort Worth?
Floating LVP flooring is often presented as the perfect weekend warrior project. And for some homeowners with the right tools, a simple square room, and plenty of patience, it can be. But for most of us, the reality of a flooring installation is more complicated. The decision to DIY or hire a professional comes down to balancing your time, skill level, and desire for a flawless, long-lasting result.
Before you start pulling up your old floors, it’s worth thinking about what a professional installation offers. It’s not just about saving yourself a sore back. An experienced team ensures every step, from subfloor preparation to the final piece of trim, is done correctly. For busy homeowners in the Dallas-Fort Worth area, hiring an expert means the job gets done quickly and correctly, letting you get back to your life without the stress of a project lingering for weeks. A professional can also spot and solve subfloor issues you might not notice, preventing problems like squeaks or uneven planks down the road. It’s an investment in getting the job done right the first time, avoiding costly mistakes that can be difficult and expensive to fix later.
When to Call for Help with Tricky Layouts or Tight Deadlines
If your home has an open-concept floor plan, lots of angles, or tricky obstacles like a kitchen island, a DIY project can quickly become a headache. The first few rows are the most critical for getting a straight, stable floor, and they’re also the hardest to install. One small mistake at the beginning can create bigger, more noticeable gaps later on. If you’re on a tight timeline for moving in or selling your home, a professional crew is your best bet. Our team can complete most LVP installations in just a day or two, a pace that’s tough to match on your own while juggling other responsibilities.
The Peace of Mind of a Professional Installation
While laying the planks might seem straightforward, a truly durable floor depends on expert preparation and technique. A professional installer ensures your subfloor is perfectly level, makes precise cuts around door jambs and vents, and knows how to create a layout that looks balanced and beautiful. This attention to detail makes a huge difference in how your floor looks and how long it lasts. Ultimately, hiring a pro gives you peace of mind. You can trust that the job is done right, the materials are handled correctly, and the final result will be a floor you love for years. If you’d like an expert opinion, you can always request a free in-home estimate to see what your project involves.
Related Articles
- Luxury Vinyl Plank Installation: A Step-by-Step Guide
- Your Guide to Waterproof Vinyl Flooring Installation
- Vinyl (LVP/LVT) Flooring
Frequently Asked Questions
Can I install floating LVP directly over my old flooring? In some cases, yes, but it depends entirely on the condition of your existing floor. LVP can often be installed over a single layer of old, well-adhered vinyl or even tile. However, the original floor must be perfectly flat, clean, and structurally sound. Installing over a soft surface like carpet is never an option. The best approach is to have a professional evaluate the subfloor, as any imperfections underneath will eventually show through or cause installation issues.
How long does a professional LVP installation usually take? One of the biggest advantages of floating LVP is its efficient installation. For a straightforward project in a few standard-sized rooms, our professional team can often complete the entire job in just one to two days. This includes removing the old flooring, preparing the subfloor, and installing the new LVP and trim. The exact timeline depends on the size of the space and the amount of prep work needed, but it’s significantly faster than most other flooring types.
Is LVP truly waterproof? Luxury vinyl plank itself is made from materials that are 100% waterproof, meaning the planks won’t swell or warp when exposed to moisture. This makes it an excellent choice for kitchens, bathrooms, and laundry rooms. However, it’s important to remember that a floating floor installation is not a completely sealed surface. Water can still seep through the seams and get trapped between the LVP and the subfloor, so it’s always best to clean up large spills promptly.
Why is leaving an expansion gap around the edges so critical? All floating floors, including LVP, need a little room to move. As your home’s temperature and humidity change throughout the seasons in North Texas, the flooring will naturally expand and contract by a tiny amount. The quarter-inch gap left around the perimeter gives the floor space to do this without buckling or putting pressure on the locking system. Your baseboards and trim will completely hide this gap, so you’ll never see it.
What happens if I damage a single plank later on? Repairing a floating LVP floor is much simpler than fixing traditional glue-down or nail-down flooring. If a plank gets scratched or dented, it can be replaced without having to tear up the entire floor. A professional can carefully remove the trim, unlock the planks leading to the damaged one, swap it out with a new piece, and then lock everything back into place. This is why we always recommend keeping a few extra planks after your installation is complete.