
You’ve invested in beautiful new luxury vinyl planks, and you expect them to last. But their long-term performance depends entirely on the strength of the bond with your subfloor. For homes with a concrete foundation, this step is critical. Concrete presents unique challenges, from potential moisture issues to surface imperfections, that can cause the wrong glue to fail. This can lead to frustrating problems like lifting corners and hollow-sounding spots underfoot. To protect your investment and ensure a flawless finish, you need the best adhesive for vinyl flooring on concrete, one that’s formulated to handle these specific conditions and create a permanent, resilient bond.
Key Takeaways
- A solid foundation is non-negotiable: Your new vinyl floor’s success depends entirely on the concrete underneath, so make sure the slab is perfectly clean, level, and tested for moisture to prevent future peeling or bubbling.
- Match the adhesive to your specific floor: Avoid generic glues and instead select a product with excellent moisture resistance and long-term durability that is confirmed to be compatible with your chosen vinyl planks.
- Correct application creates a permanent bond: For a flawless finish, use the right notched trowel for an even spread, allow the adhesive to become tacky before laying planks, and always use a heavy roller to ensure a solid, lasting connection.
What’s the Best Adhesive for Vinyl Flooring on Concrete?
Choosing the right adhesive is just as important as selecting your beautiful new luxury vinyl plank flooring. The glue is the unsung hero that holds everything together, ensuring your floors look great and perform well for years to come. This is especially true when installing over a concrete slab, a common foundation here in the Dallas–Fort Worth area. Concrete can introduce unique challenges, like moisture vapor transmission and temperature fluctuations, which can cause the wrong adhesive to fail. When that happens, you might see planks peeling at the edges, bubbling in the middle, or creating unsightly gaps.
A professional installer doesn’t just grab any bucket of glue off the shelf. We carefully consider the specific type of vinyl you’ve chosen, the condition of your concrete subfloor, and how you use the room every day. The goal is to create a permanent, resilient bond that can withstand foot traffic, furniture, and the Texas climate. There are several types of professional-grade adhesives, each formulated with different strengths for different situations. Understanding what makes them unique helps you see why a professional recommendation is so valuable for the long-term health and beauty of your floors. It’s the difference between a floor that lasts a few years and one that lasts a lifetime.
Acrylic-Based Adhesives
Think of acrylic-based adhesives as a versatile and powerful workhorse for most residential projects. They create an incredibly strong bond that’s known for its long-term durability. What makes them a great choice for homes in North Texas is their ability to handle heat and temperature changes without weakening or becoming brittle over time. They are also formulated to resist moisture, which is a critical feature when applying flooring directly to a concrete slab that can sometimes hold dampness. Because of their reliability and resilience, acrylic adhesives are a go-to solution for ensuring vinyl floors in living rooms, bedrooms, and hallways stay firmly in place through hot summers and shifting seasons, giving you peace of mind.
Pressure-Sensitive Adhesives
Pressure-sensitive adhesives work a bit differently but are fantastic for achieving a flawless installation. An installer applies a thin layer of the adhesive to the concrete and lets it “flash off,” meaning it dries from a wet state to a tacky one before the vinyl planks are laid down. This method provides a strong, immediate grip the moment the plank is pressed into place. The real advantage here is that it allows for slight adjustments during the installation process, which is perfect for achieving flawless alignment and tight seams. This level of precision is key to a professional finish, especially with complex patterns or in long hallways where even a tiny error can become noticeable.
Epoxy Adhesives
When you need maximum strength and protection, epoxy adhesives are the answer. These are typically two-part formulas that, when mixed, create a chemical reaction resulting in a rigid, waterproof, and incredibly durable bond. This is what professionals call a “hard set” adhesive, and it’s ideal for areas that face tough conditions or heavy loads. Think of home gyms with heavy equipment, busy mudrooms, laundry rooms, or basements where moisture might be a concern. An epoxy provides a permanent solution that offers the highest level of protection against lifting, shifting, and water damage, ensuring the floor can handle almost anything you throw at it.
Urethane Adhesives
Urethane adhesives are another excellent option known for creating a powerful, lasting bond with impressive flexibility. This flexibility allows the flooring to withstand impacts and minor subfloor movement without compromising the adhesive’s hold, which is great for active households. While they are a top choice for wood flooring, they are also highly effective for luxury vinyl. It’s important to know that urethane adhesives require a specific amount of time to cure properly. They typically take about 12 to 20 hours to dry, so we always advise waiting a full 24 hours before moving heavy furniture back onto the new floor. This patience pays off with incredible long-term stability and performance.
How to Prep Concrete Before Applying Adhesive
A beautiful, long-lasting vinyl floor isn’t just about the planks you choose; it’s about the foundation they’re laid on. When it comes to installing vinyl flooring on a concrete slab, proper preparation is the single most important factor for success. Skipping these steps can lead to peeling, bubbling, and a floor that fails years before it should. A professional installation focuses heavily on what’s underneath, ensuring the concrete is perfectly ready to bond with the adhesive. This meticulous prep work is what separates a floor that looks good for a few months from one that performs beautifully for years. From cleaning the surface to testing for moisture, each step creates the ideal canvas for your new luxury vinyl plank flooring. It’s a detailed process that guarantees the adhesive can do its job, creating a permanent, powerful bond between the concrete and your new floor.
Clean and Remove Debris
Before any adhesive touches the floor, the concrete slab must be completely clean. This goes beyond a quick pass with a broom. Dust, dirt, drywall compound, and any other construction debris act as a barrier between the adhesive and the concrete, preventing a solid bond. A professional crew will thoroughly sweep and vacuum the entire area to remove all loose particles. In some cases, the floor may need to be scraped or washed to get rid of stubborn grime. The goal is to have a surface that is totally free of contaminants, ensuring the adhesive can make direct contact with the concrete for maximum grip and long-term stability.
Test for Moisture
Concrete is porous and can hold a surprising amount of moisture, which is the number one enemy of flooring adhesive. If a concrete slab is too damp, the moisture can break down the adhesive over time, causing the vinyl flooring to bubble, peel, or come loose. That’s why a professional installer will always perform a moisture test before proceeding. This critical step identifies potential issues before the flooring is even laid, preventing costly failures down the road. Here in the Dallas–Fort Worth area, slab moisture can vary, so this isn’t a step you can afford to skip. If high moisture is detected, a moisture barrier may be needed to protect your investment.
Level and Smooth the Surface
Your finished vinyl floor will only be as flat as the concrete subfloor beneath it. Any bumps, dips, or uneven spots in the slab will transfer through to the surface, creating an unstable and unattractive result. Low spots can cause planks to flex and separate, while high spots can create visible ridges and premature wear. To prevent this, the concrete must be perfectly level and smooth. Professionals will grind down high spots and use a self-leveling compound to fill in any dips or cracks. This creates a perfectly flat, stable foundation that allows the vinyl planks to lock together tightly and lie flat for a seamless, durable finish.
Remove Old Paint and Coatings
Adhesives are formulated to bond directly to porous concrete, not to paint, sealers, or old adhesive residue. If your concrete slab has been previously painted or coated, these layers must be completely removed before applying new glue. A layer of paint can easily peel away from the concrete under the stress of foot traffic, taking your new flooring with it. Professionals often use tools like a cup grinder to mechanically remove old coatings, bringing the surface back to raw, clean concrete. This ensures the new adhesive can penetrate the concrete pores and form the strongest possible bond, which is essential for the floor’s longevity.
Prime the Concrete
Once the concrete is clean, dry, and level, applying a primer is the final step to guarantee a perfect installation. Think of it like priming a wall before you paint. A concrete primer seals the porous surface, which prevents the slab from absorbing the moisture out of the adhesive too quickly. It also helps bind any remaining microscopic dust particles, creating an ideal surface for the adhesive to grip. This step significantly improves the bond strength and ensures a consistent, reliable hold across the entire floor. While it may seem like a small detail, priming is a professional touch that contributes to a flawless, long-lasting flooring installation.
Key Features to Look for in a Vinyl Flooring Adhesive
Choosing the right adhesive is just as important as picking out the perfect vinyl planks. The glue is the unsung hero that keeps your floors looking great for years, preventing peeling, bubbling, and shifting. But with so many options on the shelf, it’s easy to feel overwhelmed. The secret is knowing what features actually matter for a concrete subfloor. A high-quality adhesive creates a permanent, resilient bond that can handle moisture, temperature swings, and daily foot traffic. It’s the difference between a floor that lasts a few years and one that lasts for decades. When you’re installing vinyl over concrete, the stakes are even higher because concrete presents unique challenges, like potential moisture issues that can compromise a weaker glue. Getting this choice right is fundamental to a successful, long-lasting installation. Let’s walk through the key characteristics to look for to ensure your beautiful new floors stay put.
Moisture and Water Resistance
Concrete is porous, which means it can hold and release moisture. This is especially true for slabs in the Dallas-Fort Worth area, where humidity can fluctuate. If moisture gets trapped between your vinyl and the concrete, it can weaken the adhesive and cause the flooring to fail. That’s why selecting a glue with excellent moisture resistance is non-negotiable. High-performance acrylic-based and specialized epoxy adhesives are formulated to create a strong barrier against moisture, protecting your investment. This feature ensures your luxury vinyl plank flooring remains stable and secure, even in moisture-prone areas like basements or entryways.
Resistance to Plasticizer Migration
Here’s a term you might not hear every day: plasticizer migration. In simple terms, plasticizers are compounds added to vinyl to make it flexible. Over time, these compounds can slowly move, or “migrate,” out of the flooring and into the adhesive. When this happens, the glue can soften and lose its grip, leading to loose planks or tiles. A quality adhesive is designed to resist this process, ensuring it maintains a strong, permanent bond for the life of the floor. This is a critical detail that separates a short-term fix from a long-lasting, professional installation.
Strong Bond and Long-Term Durability
Your floors have to stand up to a lot, from kids and pets to furniture and foot traffic. The adhesive’s job is to create a bond strong enough to handle it all without failing. Acrylic-based adhesives are often recommended because they form a powerful, durable bond that can tolerate temperature changes and moisture without weakening. A tenacious bond is the foundation of a durable floor. When our team at Next Day Flooring installs your vinyl, we use adhesives proven to provide the long-term durability your home deserves, so you don’t have to worry about planks shifting or corners peeling up.
Working Time and Temperature Tolerance
Every adhesive has a specific “working time,” which is the window an installer has to lay the flooring before the glue sets. It also has a “flash off” time, which is the period you wait for the adhesive to get tacky before installation. These times are heavily influenced by room temperature and humidity. Using an adhesive with a practical working time allows for precise placement and adjustments. An experienced professional knows how to manage these factors, ensuring the adhesive is at its optimal tackiness for the strongest possible bond, regardless of the weather outside.
Vinyl Type Compatibility
Not all vinyl is made the same, and neither is adhesive. The best glues are versatile enough to work with different types of vinyl, including luxury vinyl tile (LVT), luxury vinyl plank (LVP), and vinyl-backed carpets. Before starting any project, it’s essential to confirm that the adhesive is compatible with the specific flooring you’ve chosen. The flooring manufacturer will always provide recommendations for suitable adhesives. Following these guidelines is key to a successful installation and is a standard part of our process to ensure your new floors perform exactly as they should.
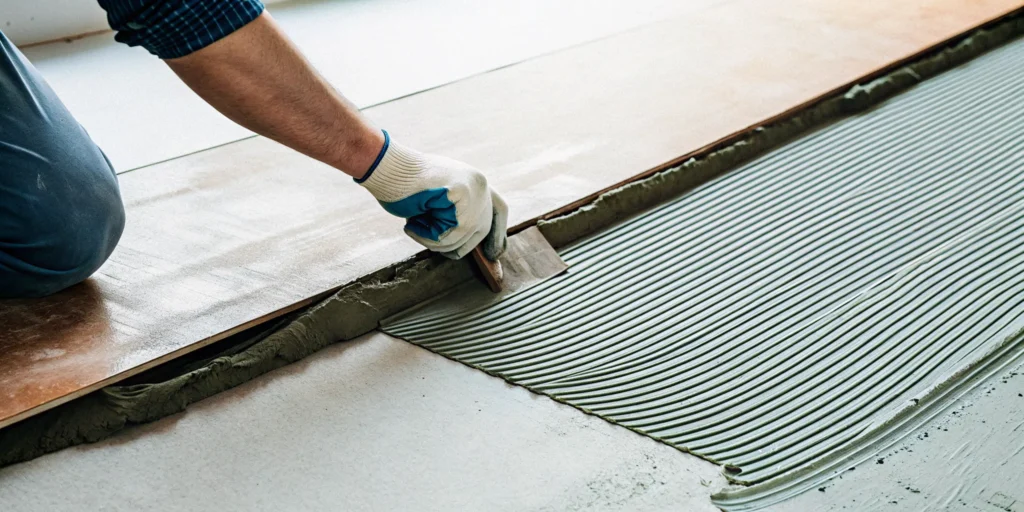
How to Correctly Apply Adhesive to Concrete
Once your concrete is prepped and you’ve chosen the right adhesive, the application process begins. This is where precision makes all the difference. Applying adhesive correctly ensures your new floors will look great and last for years without peeling, bubbling, or shifting. It’s about more than just spreading glue; it’s a methodical process that guarantees a strong, permanent bond between the vinyl and the concrete subfloor. Following these steps will help you get a professional-quality finish.
Choose the Right Trowel and Tools
Using the right tools is the first step to a flawless application. For most vinyl flooring adhesives, a 1/16″ x 1/16″ x 1/16″ V-notch trowel is the standard. The small, V-shaped notches are designed to spread the perfect amount of adhesive, creating thin, even ridges. This specific size prevents you from applying too much product, which can cause it to ooze through the seams, or too little, which can lead to a weak bond. A cheap or incorrect trowel can ruin an otherwise perfect installation, so don’t overlook this small but critical detail.
Spread the Adhesive Evenly
For the strongest possible bond, start by applying a concrete primer before you touch the adhesive. This extra step helps the adhesive grip the concrete surface more effectively. When you’re ready to spread the adhesive, work in small, manageable sections. Hold your V-notch trowel at a 45-degree angle and comb the adhesive across the floor, creating uniform ridges. An even spread is essential for preventing high spots, bubbles, or weak spots under your new floor. This is a key part of our professional vinyl flooring installation, ensuring every plank has complete, consistent contact with the subfloor.
Know Your Flash Off and Working Time
Every adhesive has its own set of rules, and it’s important to follow them. After you spread the adhesive, you need to wait for its “flash off” time. This is the short period where the adhesive becomes tacky to the touch before you lay the flooring. Placing vinyl planks too early can trap solvents and weaken the bond, while waiting too long can cause the adhesive to dry out. Check the manufacturer’s instructions for the specific flash off and working times, as they can vary based on the product, room temperature, and humidity in your Dallas–Fort Worth home.
Roll the Floor for a Solid Bond
After placing the vinyl planks onto the tacky adhesive, the final step is to roll the entire floor with a heavy floor roller (typically 75-100 pounds). This step is absolutely essential and should never be skipped. Rolling the floor applies firm, even pressure that pushes out any trapped air bubbles and ensures every square inch of the vinyl makes solid contact with the adhesive below. This action is what truly locks the flooring in place, creating a durable bond that will withstand foot traffic and prevent lifting for years to come.
Common Adhesive Mistakes to Avoid
Applying adhesive might seem straightforward, but a few common missteps can lead to peeling, bubbling, or a complete flooring failure down the road. Getting the glue-down process right is just as important as choosing the right vinyl planks. It’s the key to ensuring your new floors look great and last for years. By avoiding these frequent errors, you can protect your investment and enjoy a flawless finish.
Don’t Skip Surface Prep
The most critical mistake we see is rushing through or completely skipping surface preparation. Applying adhesive to a dirty, dusty, or uneven concrete slab is a recipe for failure. The glue needs a clean, porous surface to create a strong, permanent bond. Before you even think about opening a bucket of adhesive, the concrete must be thoroughly cleaned, completely smooth, and level. Taking the time to properly prepare the subfloor is the single most important step for a durable, long-lasting vinyl floor installation.
Avoid Using the Wrong Adhesive
Not all adhesives are created equal, and using the wrong type for your specific vinyl flooring and concrete conditions can cause major problems. For example, an adhesive that isn’t moisture-resistant could fail in a basement or bathroom. It’s essential to choose a product designed for your type of luxury vinyl plank. Acrylic-based adhesives are often a great choice because they form a tough bond that holds up well against temperature shifts and moisture. Always check that the adhesive is compatible with both vinyl and concrete for the best results.
Follow Manufacturer and Room Guidelines
Every adhesive comes with specific instructions from the manufacturer, and ignoring them is a gamble. Pay close attention to the recommended “flash off” time, which is the waiting period required for the adhesive to become tacky before you lay the planks. Applying the flooring too soon can cause the glue to ooze through the seams, while waiting too long can weaken the bond. The temperature and humidity in the room also play a big role, so make sure the environment meets the manufacturer’s requirements for a successful application.
Never Apply Adhesive to a Wet Surface
Moisture is the enemy of flooring adhesive. Applying glue to a concrete slab that isn’t completely dry will compromise the bond from the start. Trapped moisture can prevent the adhesive from curing properly, leading to loose planks, bubbles, and eventually, total flooring failure. Before any installation, the concrete should be tested for moisture to ensure it’s ready. Even if the surface feels dry to the touch, underlying moisture can still be present. A professional in-home estimate includes checking these conditions to guarantee your new floor has a solid, dry foundation.
Related Articles
- Your Guide to Waterproof Vinyl Flooring Installation
- Vinyl (LVP/LVT) Flooring
- Luxury Vinyl Plank Installation: A Step-by-Step Guide
Frequently Asked Questions
Why can’t I just use any strong glue for my vinyl flooring? Flooring adhesives are highly specialized products formulated to do a very specific job. Unlike a general-purpose construction glue, a professional vinyl adhesive is designed to resist moisture from the concrete slab and withstand plasticizer migration, which is a chemical process that can soften and weaken the wrong kind of glue over time. Using the correct adhesive ensures your floor remains stable and secure for its entire lifespan.
What are the signs that the wrong adhesive was used on a floor? The most common signs of adhesive failure are planks that peel up at the corners or edges, bubbles or bumps appearing in the middle of the floor, and gaps forming between the planks. These issues often don’t appear immediately but develop over months as foot traffic, temperature changes, and moisture begin to break down an improper bond.
My concrete floor looks clean and flat. Is all that prep work really necessary? Yes, it’s absolutely essential. Even a subfloor that looks perfect to the naked eye can have issues that prevent a strong bond. Microscopic dust, old paint or sealer residue, and unseen moisture vapor can all act as a barrier between the adhesive and the concrete. Professional preparation ensures the surface is truly ready, creating the perfect foundation for a floor that will last for years.
How do you determine which adhesive is right for my specific home? Our recommendation is based on a few key factors. We consider the specific type of luxury vinyl you’ve selected, how the room will be used (for example, a high-moisture laundry room versus a bedroom), and the results of a professional moisture test on your concrete slab. This allows us to choose an adhesive with the right properties to guarantee a durable, long-term installation for your home.
What does “flash off” time mean, and why is it so important? “Flash off” time is the short waiting period after the adhesive is spread but before the planks are laid. During this time, the adhesive transitions from wet to tacky, which is the ideal state for creating a strong grip. If you install the planks too early, the bond will be weak; if you wait too long, the adhesive will dry out and won’t stick properly. Getting this timing right is a critical step for a successful installation.