
The best home upgrades are the ones that make your daily life simpler. That’s the real promise of waterproof vinyl flooring—it gives you a beautiful, modern look without the constant worry. You can finally relax, knowing your floors are built to withstand spills, pets, and busy family life. But achieving that true peace of mind requires more than just great materials; it demands an installation that’s just as reliable. A meticulous waterproof vinyl flooring installation is what guarantees a seamless, durable surface that performs as well as it looks. In this guide, we’ll break down the process so you can see how it all comes together.
Key Takeaways
- Proper Subfloor Prep is Non-Negotiable: Before laying a single plank, ensure your subfloor is completely flat, clean, and dry. This is the single most important step to prevent future issues like gaps, creaks, and separating planks.
- Stagger Seams and Mind the Gap: For a natural, professional look, always stagger the seams between planks instead of lining them up. Be sure to leave a 1/4-inch expansion gap around the room’s perimeter to allow the floor to move with temperature changes and prevent buckling.
- Easy Maintenance Protects Your Investment: Keep your floors looking new with simple habits. Use felt pads on furniture, place doormats at every entrance, and clean regularly with a pH-neutral cleaner to avoid damage and dulling.
What Is Waterproof Vinyl Flooring (And Is It Right for You)?
So, you’re thinking about new floors and keep hearing about waterproof vinyl. What exactly is it? Simply put, waterproof vinyl flooring is a type of luxury vinyl plank (LVP) engineered to be 100% impervious to water. It gives you the stunning, realistic look of materials like hardwood or stone, but without the worry and high maintenance that often come with them. This makes it an incredibly practical choice for busy Dallas-Fort Worth homeowners who want beautiful floors that can handle the realities of daily life—from spilled drinks in the kitchen to muddy paw prints by the back door.
The secret is in its construction. Unlike older types of vinyl or water-resistant laminate, waterproof LVP features a solid, rigid core that doesn’t swell, buckle, or warp when exposed to moisture. While some guides might frame it as a simple DIY project, a flawless, truly waterproof result depends on expert installation. Proper subfloor preparation and ensuring every plank is perfectly locked are non-negotiable steps for long-term performance. So, is it the right choice for your home? Let’s look at the benefits and clear up some common confusion.
The Real Benefits of Going Waterproof
The biggest advantage of waterproof vinyl is right in the name: it’s designed to withstand moisture. This makes it the perfect flooring for kitchens, bathrooms, laundry rooms, and basements—anywhere spills and humidity are common. You don’t have to stress about a tipped glass of water or your kids splashing during bath time. Beyond its water-handling skills, this flooring is built to last. With the right care, you can expect your waterproof vinyl floors to look great for 15 to 20 years. It’s a durable, long-term solution that gives you peace of mind.
Waterproof vs. Water-Resistant: Know the Difference
It’s easy to get these terms mixed up, but the difference is critical for your home. “Water-resistant” flooring can handle small spills if you wipe them up quickly, but it can’t stop liquid from eventually seeping through to the subfloor. Think of it like a light jacket in a drizzle—it helps, but it won’t keep you dry in a downpour. “Waterproof” flooring, on the other hand, is designed to be completely non-porous. The material itself stops liquid from passing through, protecting both the plank and the subfloor underneath. This is why true waterproof vinyl is such a game-changer for homes with pets, kids, or high-traffic wet areas.
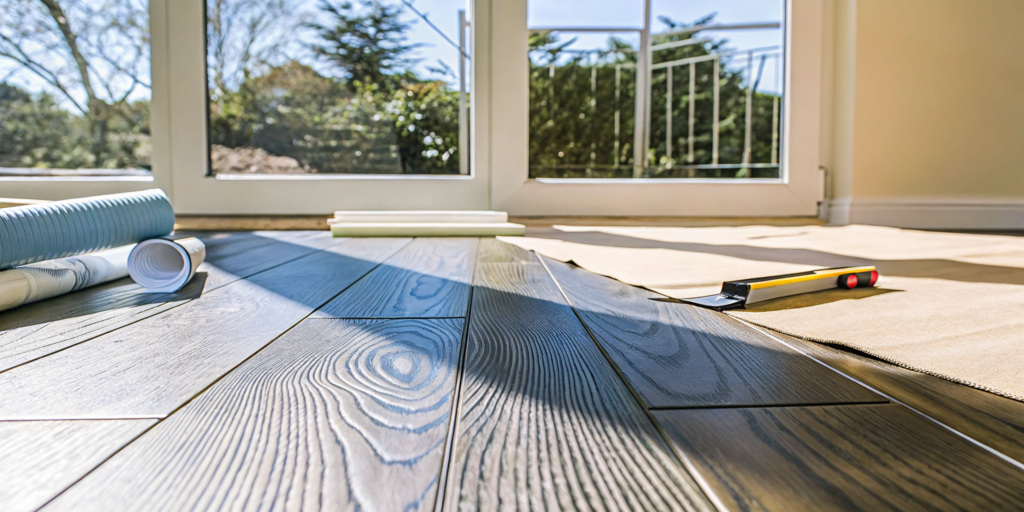
Gather Your Tools and Materials for Installation
A smooth installation starts long before you lay the first plank. Taking the time to gather everything you need upfront is the secret to avoiding frustrating mid-project hardware store runs. Think of it as setting up your workspace for success. With the right tools and materials on hand, you can focus on the task at hand and achieve a clean, professional finish that looks like it was done by a pro.
Your Must-Have Installation Tool Kit
You don’t need a workshop full of expensive equipment, but a few key tools will make your life much easier. A basic flooring installation kit usually includes a tapping block and a pull bar, which help you lock the planks together tightly without damaging them. You’ll also want a pry bar for removing baseboards and a sharp utility knife for scoring and snapping planks. For more precise work, an oscillating multi-tool is fantastic for undercutting door jambs, and a guillotine-style cutter offers clean, dust-free cuts right in the room. And trust me on this one: invest in a good pair of knee pads. Your future self will thank you.
Create Your Materials and Supplies Checklist
Before you order your flooring, you need to measure your room accurately. Calculate the total square footage by multiplying the room’s length by its width. Once you have that number, add at least 10% to it. This extra material is your “waste factor,” and it covers any mis-cuts, mistakes, or oddly shaped planks you might need for corners and doorways. Running out of flooring halfway through a project is a momentum-killer. Ordering a little extra from the same batch ensures you have enough to finish the job and that all your planks have a consistent color and finish. It’s always a good idea to keep a few extra planks for any future repairs, too.
Choose the Right Underlayment
Underlayment is the thin layer of material that goes between your subfloor and your new vinyl planks. Its job is to provide cushioning, reduce noise, and act as a moisture barrier. Many modern waterproof vinyl flooring products come with a pre-attached underlayment or “pad,” which simplifies installation and saves you a step. If your chosen flooring doesn’t have an attached pad, or if you’re installing over a concrete subfloor, you’ll need a separate vapor barrier. A simple 6 mil plastic sheeting will do the trick. This is a non-negotiable step for basements or any concrete slab, as it prevents moisture from seeping up and getting trapped under your beautiful new floors.
How to Prep Your Subfloor for a Flawless Finish
Think of your subfloor as the foundation for your new vinyl planks. If it isn’t clean, flat, and dry, you’re setting yourself up for problems down the road—think annoying squeaks, separating planks, and a finish that just looks off. Taking the time to prep your subfloor correctly is the single most important thing you can do to ensure your new floors look amazing and last for years. It’s the difference between a frustrating DIY project and a professional-quality result you can be proud of. Don’t be tempted to rush this part; a little extra effort here pays off big time, protecting your investment and giving you the durable, beautiful floors you want.
Step 1: Remove the Old Flooring
Before you can lay down anything new, the old flooring has to go. Whether it’s carpet, old tile, or sheet vinyl, you need to remove it completely to get down to the bare subfloor. This isn’t just about clearing the way; it’s your first chance to inspect what’s happening underneath. Once the old floor is up, take a moment to look for any obvious signs of trouble like water stains, mold, or rot. You’ll also want to pull up any remaining staples, tack strips, and adhesive residue to create a perfectly clean slate for the next steps.
Step 2: Check for and Address Moisture
Moisture is the number one enemy of any flooring installation. For a wood subfloor, you can use a moisture meter to check the levels. For a concrete slab, which is common in many DFW homes, the process is a bit more involved. Trapped moisture in concrete can lead to major issues, so it’s a critical step you can’t afford to guess on. If you see any discoloration or suspect moisture might be an issue, it’s wise to address the source of the leak before proceeding. Getting this right prevents your beautiful new floors from warping or failing later.
Step 3: Make Sure Your Subfloor Is Perfectly Level
Luxury vinyl planks are flexible, but they aren’t magic. They need a flat, smooth surface to lock together properly and stay that way. Any significant dips or high spots in your subfloor can cause the planks to bend, creak, and eventually break at the seams. Grab a long, straight level and check the entire floor. Most manufacturers specify that the floor should be flat within 3/16 of an inch over a 10-foot span. You can grind down high spots and use a self-leveling compound to fill in any low areas for a perfectly smooth surface.
Step 4: Let Your New Vinyl Planks Acclimate
Here’s some good news: unlike solid hardwood that needs days to adjust to a home’s environment, waterproof vinyl flooring is much more stable. It doesn’t require a long acclimation period. However, it’s still a good practice to bring the boxes into the room where they’ll be installed for at least 24 to 48 hours before you start. This allows the planks to adjust to your home’s temperature, which ensures they will lay flat and lock together easily during installation. Just make sure you don’t stack them in a corner; lay the boxes flat and give them some space.
Your Step-by-Step Guide to Installing Vinyl Planks
With your subfloor prepped and your materials ready, it’s time for the most rewarding part: laying the planks. This is where your new room really starts to take shape. Don’t rush this process—a little patience here goes a long way toward a beautiful, professional-looking result. We’ll walk through it one step at a time, from planning your layout to making those tricky final cuts.
Plan Your Layout and Measure Accurately
Before you click a single plank into place, you need a game plan. A good layout prevents awkward, narrow strips of flooring against one wall or tiny plank pieces at the end of a row. Start by measuring the width of your room. Divide that number by the width of one plank to see how many full rows you’ll have and how wide your last row will be. If the final row will be less than one-third of a plank’s width, it’s best to trim your first row lengthwise. This simple adjustment will make the first and last rows a similar width, creating a more balanced and professional look. A clear plan helps you visualize the final result and avoid common mistakes.
Lay the First Row Perfectly
Your first row is the foundation for the entire floor, so it needs to be perfectly straight. Most installations start along the longest, most visible wall. Place 1/4-inch spacers between the wall and your planks to create an expansion gap—this allows the flooring to expand and contract with temperature changes without buckling. Click the short ends of the first few planks together, making sure the seams are tight and there are no gaps. Use a level or a laser line to ensure this row is absolutely straight before moving on. An uneven first row will only cause bigger problems and wider gaps as you work your way across the room.
Continue Laying Planks and Staggering Seams
To achieve a natural wood look, you need to avoid lining up the seams between planks. A random, staggered pattern is key. As you open boxes, mix planks from several different ones to ensure a good blend of colors and patterns. A common method is to use the piece you cut off from the end of one row to start the next, as long as it’s at least six inches long. This creates a natural offset and reduces waste. Avoid creating a noticeable “step” or “H” pattern where seams are too close together. The goal is to make the layout look organic, so staggering the plank seams is one of the most important steps for a high-quality finish.
Cut Planks to Fit Around Doorways and Obstacles
Doorways, vents, and other obstacles require careful cuts. For door jambs, the cleanest look comes from undercutting the trim with a handsaw or multi-tool and sliding the plank underneath. For other complex shapes, create a template using cardboard or paper first. Trace the shape onto your plank and use a jigsaw for a precise cut. Remember the golden rule of cutting: measure twice, cut once. It’s always better to cut a piece a little too big and trim it down than to cut it too short and waste a plank. Taking your time on these detail-oriented cuts around obstacles is what separates a DIY job from a professional installation.
Avoid These Common DIY Installation Mistakes
Taking on a flooring project yourself can feel empowering, but a few common missteps can quickly turn a dream floor into a costly headache. Even the highest-quality waterproof vinyl can fail if the installation isn’t done right. The difference between a floor that looks great for years and one that starts to buckle, gap, or peel often comes down to avoiding a few critical errors that professionals are trained to spot.
Whether you’re committed to the DIY route or just want to know what to look for in a quality installation, understanding these mistakes is key. From what lies beneath the planks to the tiny gaps along the wall, every detail matters. Getting the fundamentals right ensures your new floor is not only beautiful but also durable enough to handle daily life. Overlooking them can lead to frustrating repairs that cost more time and money than simply doing it correctly from the start. We see it all the time—small installation mistakes that create big problems down the road.
Don’t Skip Proper Subfloor Prep
Think of your subfloor as the foundation for your new vinyl planks. If it isn’t perfectly flat, clean, and dry, any imperfections will eventually show through on the surface, causing planks to flex, creak, or even separate. Before a single plank is laid, the old flooring should be removed and the subfloor thoroughly inspected. This is your chance to find and fix hidden issues like moisture damage or uneven spots. A professional installer spends a significant amount of time on subfloor preparation because they know a flawless finish starts with a solid, level base. Skipping this step is one of the biggest gambles you can take with your flooring investment.
Watch Out for Damaged Planks and Uneven Seams
Modern vinyl planks are designed with a precise tongue-and-groove system that allows them to click together securely. However, if a plank’s locking mechanism is damaged or a tiny piece of debris gets stuck in the groove, it won’t create a tight seal. It’s crucial to inspect each board before you install it. Forcing a plank into place can break the locking system and create a weak spot in your floor. Even a tiny gap between seams—as small as 1/8 of an inch—can allow dirt and moisture in, eventually causing the planks to shift or tear under pressure. A tight, seamless connection is essential for a truly waterproof and durable surface.
Get Your Expansion Gaps and Transitions Right
Vinyl flooring, like many materials in your home, expands and contracts with temperature changes. To allow for this natural movement, you must leave a small space—typically 1/4 inch—between the flooring and the walls or any other fixed objects like kitchen islands or cabinets. This is called an expansion gap. Without it, the planks have nowhere to go when they expand, which can cause the entire floor to buckle or warp. Similarly, you need to use the correct transition strips where your vinyl meets another type of flooring, like carpet or tile. These strips cover the gap, protect the edges of the planks, and create a smooth, finished look.
How to Add the Finishing Touches
Once the last plank is in place, the job isn’t quite done. The final steps are what transform a freshly laid floor into a seamless, integrated part of your home. These finishing touches—installing trim, managing gaps, and performing a final inspection—are critical for both the look and the long-term durability of your new waterproof vinyl flooring.
This is where true craftsmanship shines. Paying close attention to these details protects the integrity of the installation, preventing issues like buckling and premature wear. Getting these steps right guarantees your floor will not only look beautiful on day one but will also perform flawlessly for years to come.
Install Transition Strips and Baseboards
Transition strips and baseboards are the framing for your new floor, covering gaps and creating clean lines for a polished look. You’ll need transition strips wherever the vinyl meets a different flooring type, like carpet or tile, to protect the plank edges from chipping. For a truly waterproof seal in bathrooms or kitchens, a small bead of silicone sealant along the edge before installing trim adds an extra layer of protection. Reinstalling or adding new baseboards and shoe molding is the final touch, hiding the expansion gap along the walls and tying the room together.
Correctly Manage Expansion Gaps
Vinyl plank flooring needs a little breathing room. It naturally expands and contracts with changes in temperature, so a small space—typically a quarter-inch—must be left around the room’s perimeter. This is called an expansion gap. It’s essential to maintain this gap between the flooring and any fixed object, including walls, cabinets, and pipes. Without this space, the planks could press against each other and buckle or warp over time. While the gap is a functional necessity, it’s ultimately hidden by baseboards, so you get all the benefits without seeing the space.
Complete Your Final Cleanup and Inspection
Before moving furniture back in, a thorough cleanup is essential. First, remove any spacers used during installation. Next, give the floor a detailed sweep and vacuum to pick up any dust or debris left over from the project. Even small particles of grit can act like sandpaper, causing fine scratches on your new floor’s surface. A final wipe-down with a damp mop and a pH-neutral cleaner will remove any smudges. This is also the perfect time for a final inspection to ensure every plank is secure and every seam is tight.
How to Maintain Your Waterproof Vinyl Floors
Your beautiful new waterproof vinyl floors are installed, and your home feels completely refreshed. The great news is that LVP is designed for real life, which means it’s incredibly durable and easy to care for. Unlike more demanding materials that require special treatments, waxing, or polishing, vinyl is refreshingly low-maintenance. Its protective wear layer is built to handle daily foot traffic, spills, and everything else that comes with a busy household, from kids and pets to dinner parties. With just a little routine attention, you can keep your floors looking as good as the day we installed them.
Proper maintenance is the key to protecting your investment and ensuring your floors last for years. By following a few simple steps, you prevent the small scratches and scuffs that can accumulate over time and keep the surface looking smooth and clean. This isn’t about spending your weekends scrubbing; it’s about creating simple habits that make a big difference. Think of it less as a chore and more as a simple routine to preserve that brand-new look and feel you love. We’ve put together this guide to make it as straightforward as possible, so you can spend less time cleaning and more time enjoying your beautiful home.
Your Guide to Daily Cleaning and Spill Care
The key to keeping vinyl floors pristine is consistent, gentle cleaning. Start by sweeping with a soft-bristle broom or vacuuming (just be sure to turn off the beater bar or use a hard floor setting) a couple of times a week to pick up dirt and grit. Those tiny particles can act like sandpaper over time, dulling your floor’s finish. When it comes to spills, act fast. While your floors are waterproof, it’s always best to wipe up liquids immediately to prevent any potential for staining. For weekly mopping, a damp mop is your best friend. Avoid soaking the floor with excess water. Use warm water and a pH-neutral cleaner made for vinyl flooring. Steer clear of harsh detergents or products that promise to add shine, as they can leave behind a sticky, dulling film.
Protect Your Floors from Scratches and Damage
Prevention is the easiest way to protect your floors from daily wear and tear. One of the simplest and most effective things you can do is place felt pads on the bottom of all your furniture legs—chairs, tables, sofas, you name it. This allows them to slide smoothly without scratching the surface. When moving heavy appliances or furniture, never drag them across the floor. Place doormats at every entrance to your home. They do a fantastic job of trapping the dirt, sand, and moisture that would otherwise be tracked inside. This small step significantly reduces the amount of abrasive debris that gets on your floors. Remember to avoid using rubber-backed or latex-backed mats, as they can sometimes discolor the vinyl over time.
Learn How to Deep Clean and Make Minor Repairs
Every few months, your floors might benefit from a slightly deeper clean, especially in high-traffic areas. This doesn’t mean you need to break out harsh scrub brushes or steamers, which can damage the wear layer. A deep clean simply involves a thorough mopping with your pH-neutral cleaner, paying close attention to corners and baseboards. For common scuffs left by shoes, you can often buff them out with a clean tennis ball or a microfiber cloth. If you encounter a minor scratch, don’t panic. There are vinyl floor repair kits available that can help conceal small imperfections and blend them seamlessly with the rest of your flooring. Taking care of these small issues as they appear will keep your floors looking flawless for the long haul.
Related Articles
- Vinyl (LVP/LVT) Flooring – Next Day Flooring
- Laminate Flooring – Next Day Flooring
- Cost of Laminate Flooring: A Complete Breakdown – Next Day Flooring
- FAQs – Next Day Flooring
Frequently Asked Questions
Is waterproof vinyl flooring truly 100% waterproof? Yes, the planks themselves are completely impervious to water. The core is made of a solid vinyl composite that won’t swell or warp, no matter how long liquid sits on it. However, a truly waterproof floor system depends on a flawless installation. If the planks aren’t locked together perfectly, water can find its way through the seams to your subfloor. That’s why professional installation is so important for ensuring the entire surface is sealed and protected.
Can I install waterproof vinyl flooring myself? While many brands market their products as DIY-friendly, a successful, long-lasting result depends heavily on proper subfloor preparation. Getting the subfloor perfectly clean, flat, and level is the most critical step, and it’s where most DIY projects go wrong. Any imperfections underneath can cause the planks to separate or creak over time. A professional installation ensures this foundation is perfect, protecting your investment and guaranteeing a beautiful finish.
Is this a good choice for a home with kids and pets? Absolutely. In fact, it’s one of the best flooring options for busy households. Beyond being waterproof and handling spills or pet accidents without issue, it’s also incredibly durable. The top wear layer is designed to resist scratches from dog nails, scuffs from dragged toys, and the general wear and tear of daily foot traffic. It gives you the high-end look of hardwood with far less worry and maintenance.
How is this different from water-resistant laminate? The key difference is the core material. Water-resistant laminate has a core made of high-density fiberboard, which is essentially wood composite. While it has a protective top layer, if water sits too long and seeps into the seams, that wood-based core can still swell and get damaged permanently. True waterproof vinyl has a solid polymer core that simply cannot absorb water, making it a much safer choice for kitchens, bathrooms, and basements.
Do I really need to leave a gap around the edges of the room? Yes, that expansion gap is non-negotiable. All floating floors, including vinyl plank, need a little bit of room to expand and contract with your home’s temperature changes throughout the year. Without that small gap around the perimeter, the planks could press against the walls and buckle in the middle of the room. Don’t worry, this functional space is completely covered by baseboards and trim, so you’ll never even see it.